“], “filter”: { “nextExceptions”: “img, blockquote, div”, “nextContainsExceptions”: “img, blockquote, a.btn, a.o-button”} }”>
Heading out the door? Read this article on the new Outside+ app available now on iOS devices for members!
>”,”name”:”in-content-cta”,”type”:”link”}}”>Download the app.
Chances are you’re no stranger to feeling anxious, overwhelmed, or depleted. And there are many ways you can soothe your nervous system so you can start to remember what it feels like to be yourself. Yin yoga is one of those ways.
The following yin yoga practice is designed to help you know what it feels like to be supported. Props are helpful although you can easily substitute pillows, couch cushions, or whatever you have at home for blocks. Sometimes you need to be reminded that it’s okay to allow yourself to reach out for support instead of trying to do it all yourself.
What Is Yin Yoga?
In yin yoga, we remain in the poses for a few minutes, so there’s time for you to create space where you can tune into yourself and listen to your inherent wisdom. Although the following sequence of poses will help with full-body flexibility by targeting all the major parts of the body and is completely suitable for beginners to yoga, it’s intended for the student who feels anxious or depleted or burnt out. It’s meant to be all about self care, rest, and relaxation.
There are three principles that we work with in yin yoga. The first is to find your edge, the second is to resolve to be still, and the last is to hold the pose for a length of time.
Your edge is that first point of sensation. You’re not pushing yourself too much and you’re not chasing intensity. With yin poses, don’t feel like you have to go all the way to the end of your range of motion. You want it to be like a four out of 10 on an intensity scale. Being still means try not to fidget or move in any way or contract your muscles. Really let gravity do the work for you. And holding the pose for time means that you’re here for a few minutes so the pose can work on the fascia, which is the deep connective tissue of the body. As you stay in each pose, let yourself find a slow, steady breath.
Your body will naturally open up the longer you hold a shape. Sometimes you’ll feel yourself slip more deeply into the pose. You can absolutely pull back at any time if it feels too intense.
You’re learning to give yourself permission to go easy and slow down, so be patient with yourself. Once you do finally have the experience of being able to let go, you can feel the difference. And you will feel more like yourself.
Yin Yoga to Slow Down and Practice Self-Care
I recommend having two blocks. If you don’t have that at home, grab some pillows or couch cushions or something that you can use to close the gap between your body and the floor.
Supported Fish
Place your blocks on their second level. The first one goes underneath the upper back and the other one supports the back of the head. Sit facing away from the blocks and lower yourself onto the blocks in Supported Fish. You can have your legs either straight in front of you or in a butterfly shape. Whatever feels comfortable for you. If you want the hip opener, bring the soles of your feet to touch and let your knees fall open to the sides.
Let your breath be at a natural pace so you’re not forcing it. Each time you exhale, see if you can drop whatever’s been on your mind lately. Give yourself full permission to just take care of you.
From here, tuck your chin toward your chest, using your hand for support if needed, and lift yourself off the blocks and move them off to the side. Give yourself a moment to rest with your spine completely level to the ground and feel the effects of that first pose.
Supported Bridge
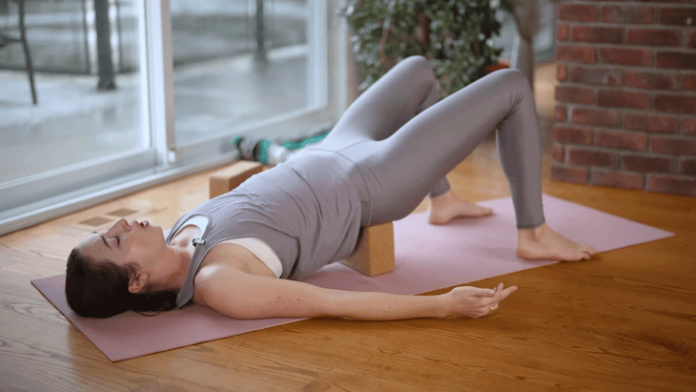
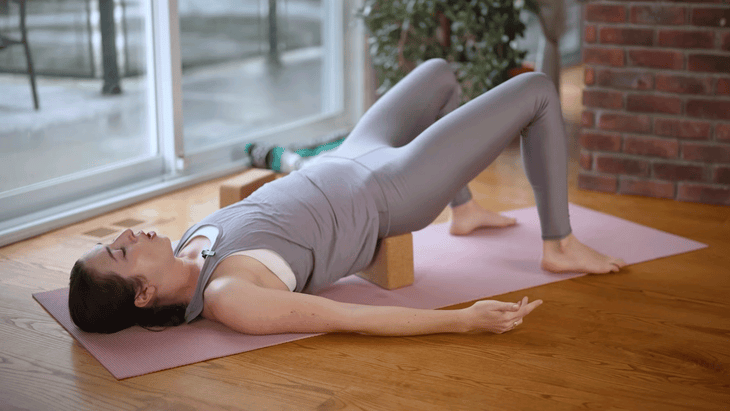
Bend into your knees, lift your hips, and move one of the blocks underneath your sacrum, which is the lowest part of your lower back, in Supported Bridge. You can adjust the block to any height that feels suitable to you. Maybe that first level is enough or, if you’d like, you can go up to the second height. Just make sure this doesn’t cause any discomfort, especially in your lower back.
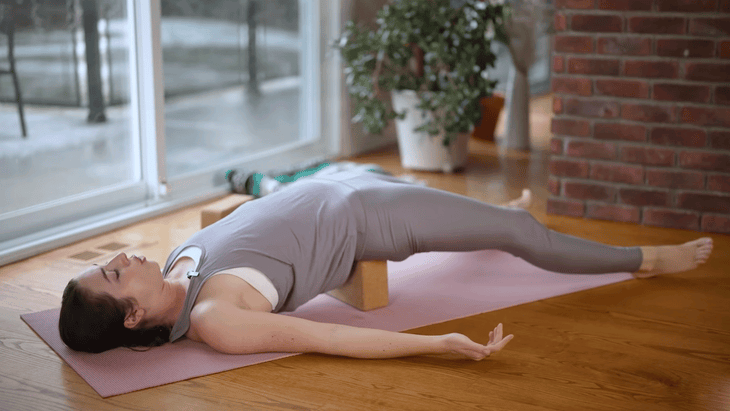
You have some options with the legs here as well. The traditional Supported Bridge Pose is with your knees bent and your feet flat on the mat. You can make this more intense by straightening your legs. Be really careful with your lower back here. You can also do a butterfly variation here by taking the soles of the feet together, knees apart.
Try to shrug your shoulders away from your ears, relax tension from your neck and your facial muscles. Notice if you’re frowning or if you’re squinting with your eyes. Just feel yourself melt into the support beneath you as you stay here for a few minutes.
If your legs are straight, bend your knees again and push through your feet to lift your hips off the block. Move the block off to the side and again give yourself a moment to pause with your spine level on the mat. It might feel good to let your knees rest against one another or maybe it feels better for you to pull your knees toward your belly. Breathe here.
Half Butterfly Variation
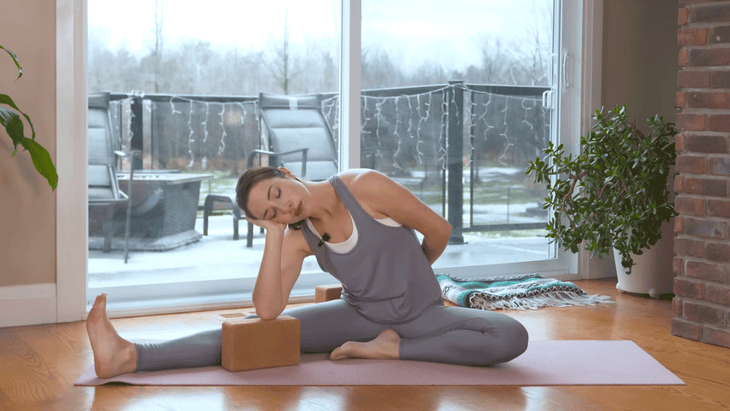
Roll onto one side and use your arms to push into the mat and lift yourself into a sitting position. Take your right leg straight out to the side and bend your left knee to bring the bottom of your foot to your inner right thigh. You’re welcome to fold your chest directly over your straight leg or you can take a side-bending version in which you lean your right elbow onto a block placed inside your right leg. And then you can support your head with your right hand. You can take your left hand behind you, toward your lower back, to help roll your shoulder back almost as if you’re leaning against the wall behind you.
You’re getting a hamstring stretch here and, at the same time, stretching through your left side. If you find it difficult to breathe deeply in and out through your nose, it’s usually an indication that you’ve gone a little too far into the pose. It’s perfectly fine if you have a bit of a bend in your right knee. You can play a little with the angle that you have between your chest and your legs.
If you had your left hand to your lower back, bring it in front of you and push into the floor and very slowly rise. Then set yourself up for your side-bending Half Butterfly on the other side, so your right knee bends and your left leg extends straight.
If you notice your mind beginning to wander or getting distracted in some way, just acknowledge it. Don’t make a big deal out of it. Just come back to the present moment, focusing on the flow of your breath or focusing on the sensation of the pose. Remember, this is meant to be a self care practice, so you don’t want to spend your time ruminating over things or worrying or planning what it is that you’re going to do next. You’re really taking the time to pause.
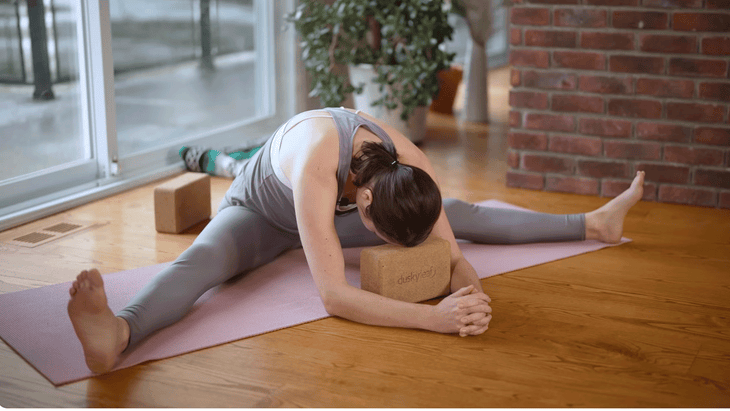
Straddle
You’re going to take both legs into a wide-legged shape and then bend forward in Straddle. In yin yoga, you don’t have to have a flat back and you can allow your spine to round. So blocks can be really nice to have here for this, either one or both. Maybe you rest your forehead on a block turned on its highest level or rest your forearms on blocks on the lowest level. You can play around a little with the height of your block or use whatever props you have at home. Try to relax into the shape as much as possible and let yourself stay here. Keep breathing deeply.
Push your hands into the floor and walk them back toward you, inch by inch, as you lift your chest and head. Keep breathing while coming out of the pose. Be sure you’re not rushing through your transitions. Bring your legs toward one another and do whatever feels good here before you transition into your next pose.
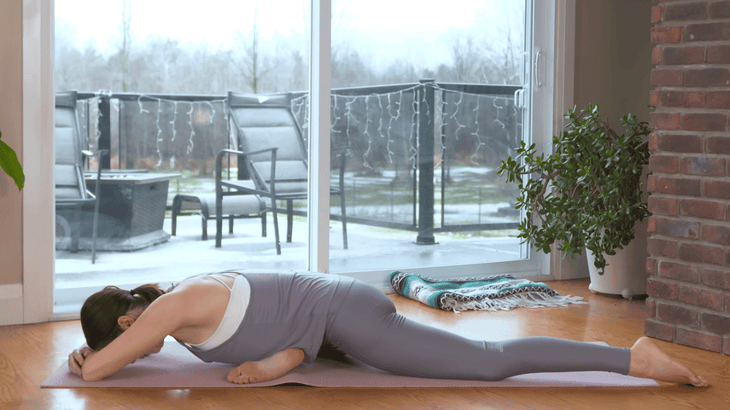
Sleeping Swan Pose
Transition into Swan Pose, which is similar to Pigeon Pose, starting on your right side. Bring your right knee behind your right wrist. And if you feel like your hips are hovering uncomfortably off the mat, having one block to support you beneath your right hip can make the pose a lot easier. Then lean forward. And think of really lengthening and stretching out of your lower back as you fold forward and down, you can always stay up onto your forearms or bring your forehead down to the mat.
So you’re not making this so intense that you have a hard time breathing but instead relaxing into it as much as possible. We’re letting gravity do the work for us. This can be quite an intense hip opener, so less really is more. You can also play around with having a block beneath your chest or head. Again, taking a moment to really find and honor your edge.
Push your hands into the ground to lift your chest and head and then transition onto hands and knees, maybe stretching your right leg behind you, doing some hip circles, or moving in whatever way feels good to release your right hip.
Whenever you’re ready, ease over to the second side. You might need to make accommodations and adjustments here that were different on the other side. Remember, you’re doing this for self care. You’re not trying to prove anything or push yourself too far. This is meant to feel good and to be nurturing. Let go of expectations and just meet your body wherever it is today.
Lift out nice and slow and, just like before, come back to Tabletop and take any movements or counter pose that feel good here.
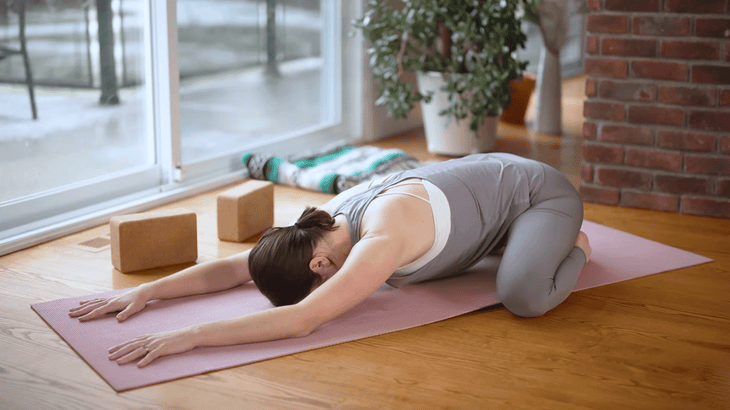
Child’s Pose
From hands and knees, your big toes come together, take your knees as wide as you would like, and press your hips back toward your heels and then fold forward. Be careful not to hike your shoulders all the way up towards your ears and to give your neck lots of space as you try to kind of melt your chest down toward the floor in Child’s Pose. At the same time, melt your hips back. Breathe here.
Walk your hands back so you can lift yourself and then sit back on your heels for a moment to do a simple twist. Bring your knees in toward one another and bring your left hand to your right knee as you take your right fingertips behind you, rotating your chest toward the right. Pull your lower belly in and sit tall. Then release and switch sides.
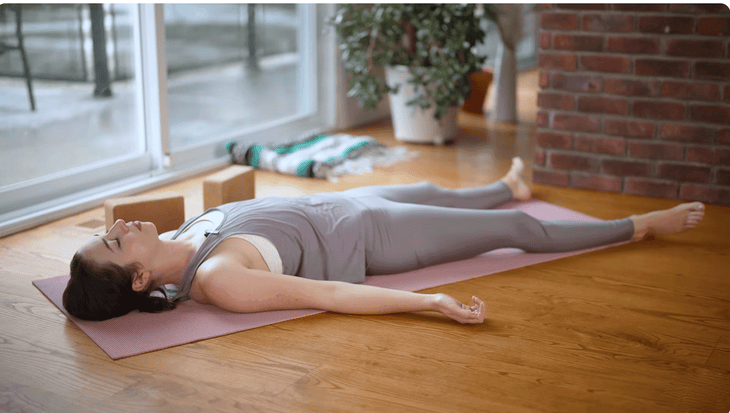
Savasana
Lower all the way down onto your back as you get ready for Savasana, your final resting pose following your yin yoga practice. You can draw your knees toward your chest first, maybe rocking a little side to side or widening your feet and lowering your knees to one side and then the other in a little windshield-wiper motion to release the low back. When you’re ready, extend your arms and your legs and really take the time to get super comfortable and settled here. Take a nice long Savasana, one of the best kinds of poses that you can do for self care.
Feel yourself get a little bit heavier with every exhalation. You might scan your body, starting at the crown of your head and gently working your way down, inviting each body part to relax and release a little more so you can really enjoy this full body relaxation with no lingering tension or stiffness. You’ll stay here for a few minutes.
When you’re ready, very slowly use the power of your breath to bring a little more energy back into your body, maybe first just through the extremities, as you open and close your hands, roll your ankles, or maybe turn your head from side to side. It might feel good to act as if you were waking up in the morning by extending your arms alongside your head and getting that big stretch from your fingers to your toes.
Start to deepen your breath and then slowly roll to one side and push your hands into the floor to lift yourself. Sit tall and stay really present. You can close your eyes once you’ve come to a comfortable position for your hips and your low back. Release your shoulders away from your ears. Stay here or take your hands together at your heart and really take a moment to honor yourself, to give yourself a kind word, to notice the effects of your practice, to feel whatever has changed and shifted.
About Our Contributor
Kassandra Reinhardt is an Ottawa-based Yin Yoga and vinyasa yoga instructor whose YouTube channel, Yoga With Kassandra, has grown to 2.2 million subscribers and has more than 230 million views. Kassandra recently released her guided yoga journal, My Yoga Journey: A Guided Journal, her daily affirmation card deck, I Radiate Joy,and her book, Year of Yoga.


